魔改教程总结(三)
前言📇
- 本文参考博客魔改教程总结(一)、博客魔改教程总结(二)、Iconfont Inject、糖果屋微调合集
- 本系列基本上都是各位大佬造好的轮子,具体参考 Fomalhaut大佬。其目的在于防止各位大佬的链接失效,且个人复习总结使用,如有侵权请联系删除。
- 本系列起始空白的虚拟机,一步一步搭建魔改页面,使用本地端口。若想部署在其它平台,可自寻查找。
- 鉴于每个人的根目录名称都不一样,本帖博客根目录一律以
[BlogRoot]指代。- 本帖涉及魔改源码的内容,会使用diff代码块标识,复制时请不要忘记删除前面的
+、-符号。- 因为
.pug和.styl以及.yml等对缩进要求较为严格,请尽量不要使用记事本等无法提供语法高亮的文本编辑器进行修改。- 本系列基于
Butterfly主题进行魔改方案编写,hexo 版本6.3.0,Butterfly 版本4.12.0。- 魔改会过程常常引入自定义的css与js文件,具体方法见方法见Hexo博客添加自定义css和js文件
博客搭建与魔改系列教程导航🚥🚥🚥
- 🎀hexo基础搭建教程(一)
- 🎆hexo基础搭建教程(二)
- 🎇魔改教程总结(一)
- 🧨魔改教程总结(二)
- ✨魔改教程总结(三)⬅当前位置🛸
文章页顶波浪线(安知鱼)
点击查看教程
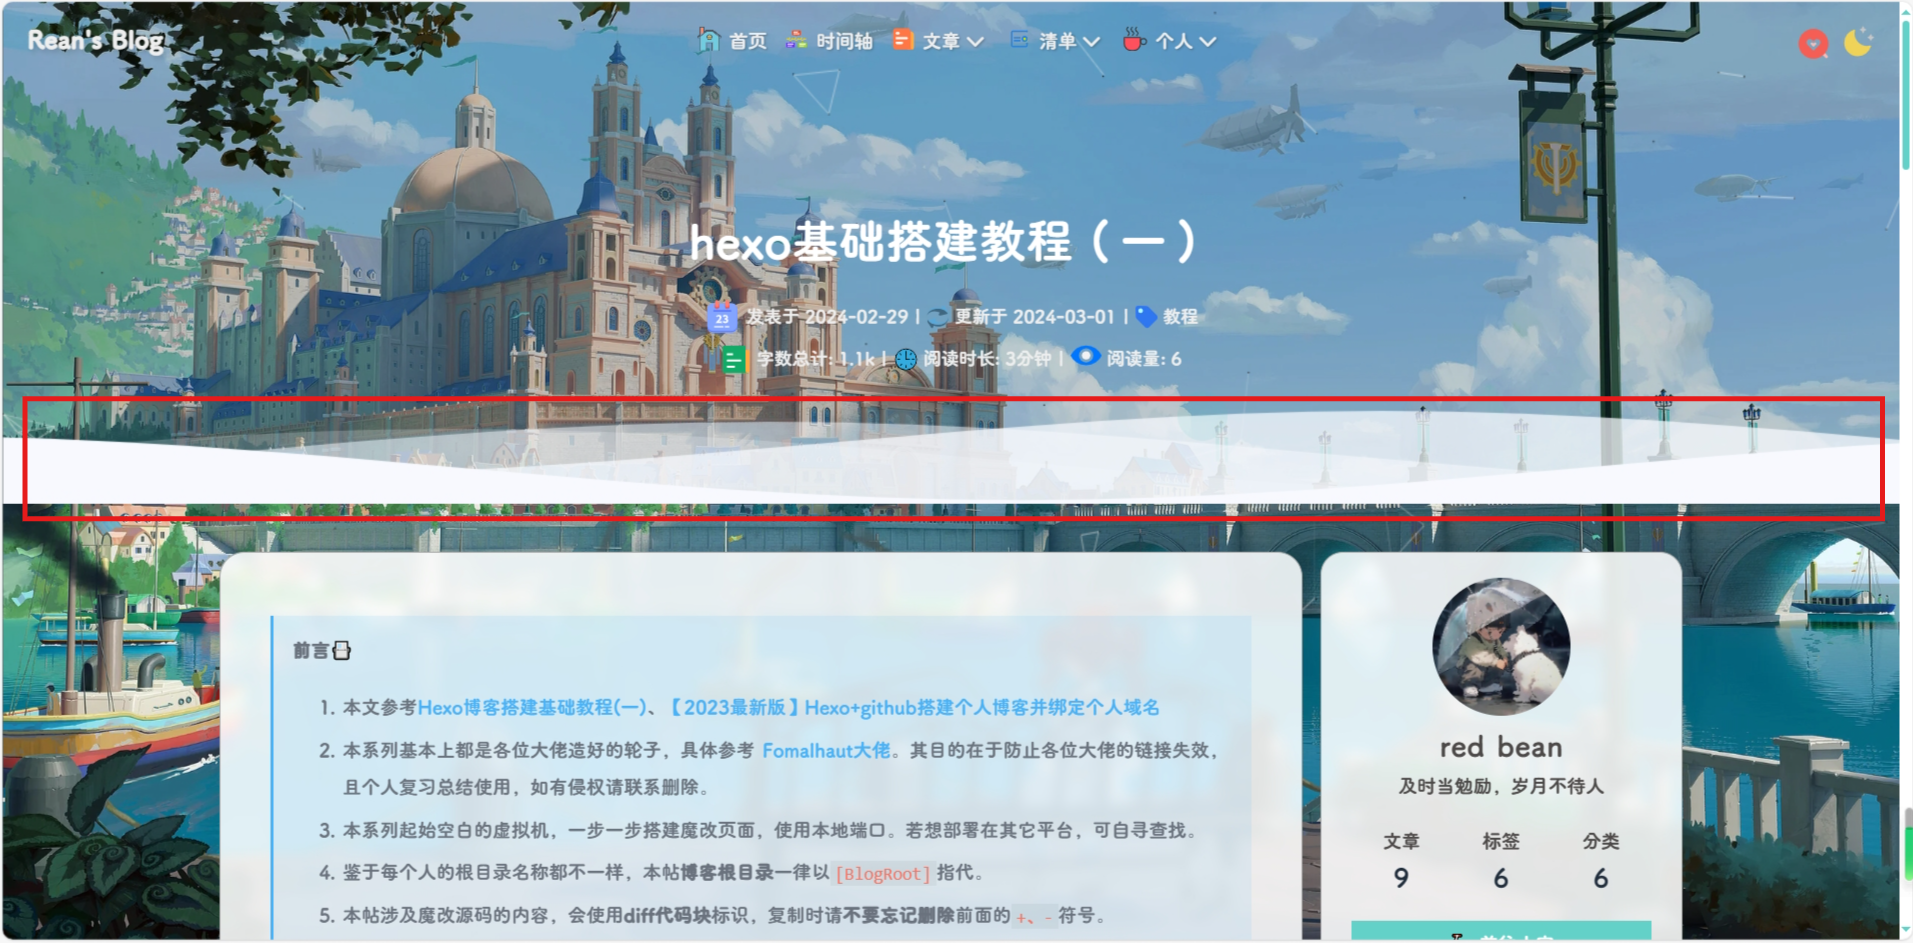
修改
[BlogRoor]\themes/butterfly/layout/includes/header/index.pug大概第 37 行左右1
2
3
4
5
6
7
8
9
10
11
12
13
14
15
16
17
18if top_img !== false
if is_post()
include ./post-info.pug
+ section.main-hero-waves-area.waves-area
+ svg.waves-svg(xmlns='http://www.w3.org/2000/svg', xlink='http://www.w3.org/1999/xlink', viewBox='0 24 150 28', preserveAspectRatio='none', shape-rendering='auto')
+ defs
+ path#gentle-wave(d='M -160 44 c 30 0 58 -18 88 -18 s 58 18 88 18 s 58 -18 88 -18 s 58 18 88 18 v 44 h -352 Z')
+ g.parallax
+ use(href='#gentle-wave', x='48', y='0')
+ use(href='#gentle-wave', x='48', y='3')
+ use(href='#gentle-wave', x='48', y='5')
+ use(href='#gentle-wave', x='48', y='7')
#post-top-cover
img#post-top-bg(class='nolazyload' src=bg_img)
else if is_home()
#site-info
h1#site-title=site_title
if theme.subtitle.enable为了方便复制,提供一份需要修改的部分:
1
2
3
4
5
6
7
8
9section.main-hero-waves-area.waves-area
svg.waves-svg(xmlns='http://www.w3.org/2000/svg', xlink='http://www.w3.org/1999/xlink', viewBox='0 24 150 28', preserveAspectRatio='none', shape-rendering='auto')
defs
path#gentle-wave(d='M -160 44 c 30 0 58 -18 88 -18 s 58 18 88 18 s 58 -18 88 -18 s 58 18 88 18 v 44 h -352 Z')
g.parallax
use(href='#gentle-wave', x='48', y='0')
use(href='#gentle-wave', x='48', y='3')
use(href='#gentle-wave', x='48', y='5')
use(href='#gentle-wave', x='48', y='7')在
[BlogRoor]\themes/butterfly/layout/includes/header/index.pug最底下加入1
2
3
4
5
6
7
8
9
10
11
12
13
14
15else
#page-site-info
h1#site-title=site_title
+ //- 安知鱼波浪
+ //- 归档页,关于页等其他不是文章页的
+ section.main-hero-waves-area.waves-area
+ svg.waves-svg(xmlns='http://www.w3.org/2000/svg', xlink='http://www.w3.org/1999/xlink', viewBox='0 24 150 28', preserveAspectRatio='none', shape-rendering='auto')
+ defs
+ path#gentle-wave(d='M -160 44 c 30 0 58 -18 88 -18 s 58 18 88 18 s 58 -18 88 -18 s 58 18 88 18 v 44 h -352 Z')
+ g.parallax
+ use(href='#gentle-wave', x='48', y='0')
+ use(href='#gentle-wave', x='48', y='3')
+ use(href='#gentle-wave', x='48', y='5')
+ use(href='#gentle-wave', x='48', y='7')
然后在
_config.butterfly.yml的[inject.head]或者自定义 css 中 引入以下 css1
2
3
4
5
6
7
8
9
10
11
12
13
14
15
16
17
18
19
20
21
22
23
24
25
26
27
28
29
30
31
32
33
34
35
36
37
38
39
40
41
42
43
44
45
46
47
48
49
50
51
52
53
54
55
56
57
58
59
60
61
62
63
64
65
66
67
68
69
70
71
72
73
74
75
76/*-------------------------------- 文章页面波浪线 -------------------------*/
/* 波浪css */
.main-hero-waves-area {
width: 100%;
position: absolute;
left: 0;
bottom: -11px;
z-index: 5;
}
.waves-area .waves-svg {
width: 100%;
height: 5rem;
}
/* Animation */
.parallax > use {
animation: move-forever 25s cubic-bezier(0.55, 0.5, 0.45, 0.5) infinite;
}
.parallax > use:nth-child(1) {
animation-delay: -2s;
animation-duration: 7s;
fill: #f7f9febd;
}
.parallax > use:nth-child(2) {
animation-delay: -3s;
animation-duration: 10s;
fill: #f7f9fe82;
}
.parallax > use:nth-child(3) {
animation-delay: -4s;
animation-duration: 13s;
fill: #f7f9fe36;
}
.parallax > use:nth-child(4) {
animation-delay: -5s;
animation-duration: 20s;
fill: #f7f9fe;
}
/* 黑色模式背景 */
[data-theme="dark"] .parallax > use:nth-child(1) {
animation-delay: -2s;
animation-duration: 7s;
fill: #18171dc8;
}
[data-theme="dark"] .parallax > use:nth-child(2) {
animation-delay: -3s;
animation-duration: 10s;
fill: #18171d80;
}
[data-theme="dark"] .parallax > use:nth-child(3) {
animation-delay: -4s;
animation-duration: 13s;
fill: #18171d3e;
}
[data-theme="dark"] .parallax > use:nth-child(4) {
animation-delay: -5s;
animation-duration: 20s;
fill: #18171d;
}
@keyframes move-forever {
0% {
transform: translate3d(-90px, 0, 0);
}
100% {
transform: translate3d(85px, 0, 0);
}
}
/*Shrinking for mobile*/
@media (max-width: 768px) {
.waves-area .waves-svg {
height: 40px;
min-height: 40px;
}
}
/*-------------------------------- end -------------------------*/需要注意的是 css 中
fill属性可以控制波浪颜色,最好使其中一个颜色与背景颜色一致,否则会显的有点奇怪,然后就是重启项目1
2
3
4# git bash
hexo cl && hexo g && hexo s
# vscode
hexo cl; hexo g; hexo s
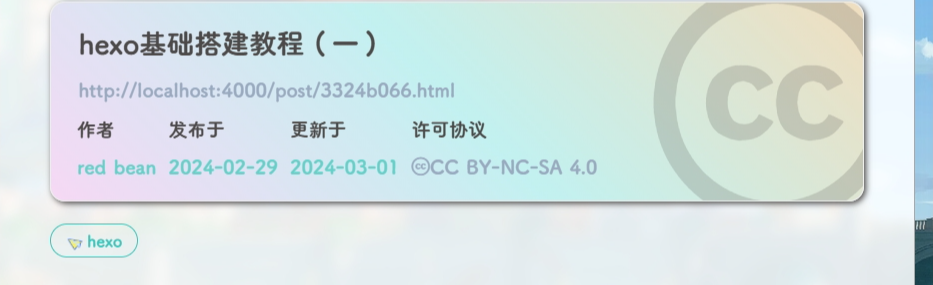
渐变色版权美化(店长+微调)
点击查看教程
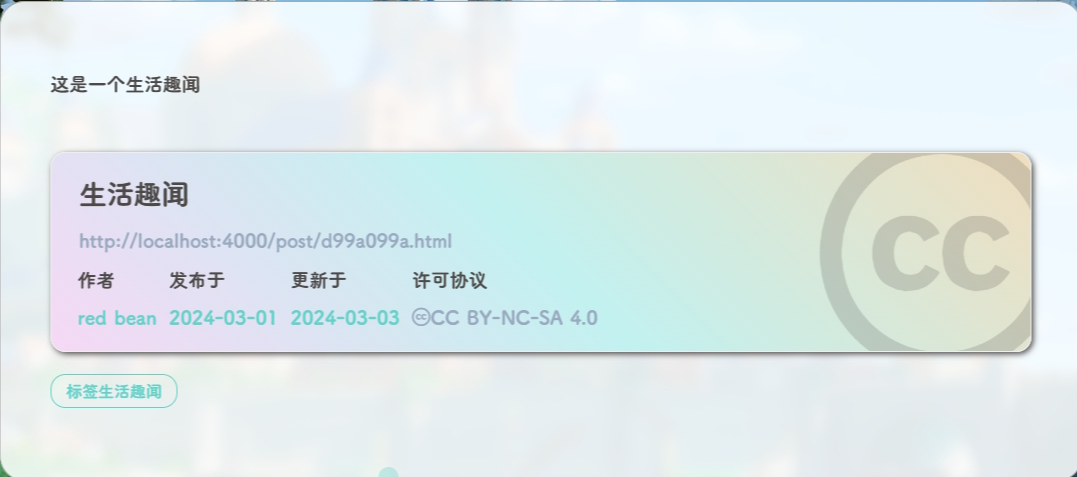
修改
[BlogRoot]\themes\butterfly\layout\includes\post\post-copyright.pug,直接复制以下内容替换原文件内容。此处多次用到了三元运算符作为默认项设置,在确保有主题配置文件的默认项的情况下,也可以在相应文章的front-matter中重新定义作者,原文链接,开源许可协议等内容。1
2
3
4
5
6
7
8
9
10
11
12
13
14
15
16
17
18
19
20
21
22
23
24
25
26
27
28
29
30
31
32if theme.post_copyright.enable && page.copyright !== false
- let author = page.copyright_author ? page.copyright_author : config.author
- let url = page.copyright_url ? page.copyright_url : page.permalink
- let license = page.license ? page.license : theme.post_copyright.license
- let license_url = page.license_url ? page.license_url : theme.post_copyright.license_url
.post-copyright
.post-copyright__title
span.post-copyright-info
h #[=page.title]
.post-copyright__type
span.post-copyright-info
a(href=url_for(url))= theme.post_copyright.decode ? decodeURI(url) : url
.post-copyright-m
.post-copyright-m-info
.post-copyright-a
h 作者
.post-copyright-cc-info
h=author
.post-copyright-c
h 发布于
.post-copyright-cc-info
h=date(page.date, config.date_format)
.post-copyright-u
h 更新于
.post-copyright-cc-info
h=date(page.updated, config.date_format)
.post-copyright-c
h 许可协议
.post-copyright-cc-info
a.icon(rel='noopener' target='_blank' title='Creative Commons' href='https://creativecommons.org/')
i.fab.fa-creative-commons
a(rel='noopener' target='_blank' title=license href=url_for(license_url))=license修改
[BlogRoot]\themes\butterfly\source\css\_layout\post.styl,直接复制以下内容,替换原文件,这个文件就是自己调节样式的。其中,184行是白天模式的背景色,这里默认是我网站的渐变色,大家可以根据自己的喜好调节;253行是夜间模式的发光光圈颜色,大家也可以自行替换成自己喜欢的颜色:1
2
3
4
5
6
7
8
9
10
11
12
13
14
15
16
17
18
19
20
21
22
23
24
25
26
27
28
29
30
31
32
33
34
35
36
37
38
39
40
41
42
43
44
45
46
47
48
49
50
51
52
53
54
55
56
57
58
59
60
61
62
63
64
65
66
67
68
69
70
71
72
73
74
75
76
77
78
79
80
81
82
83
84
85
86
87
88
89
90
91
92
93
94
95
96
97
98
99
100
101
102
103
104
105
106
107
108
109
110
111
112
113
114
115
116
117
118
119
120
121
122
123
124
125
126
127
128
129
130
131
132
133
134
135
136
137
138
139
140
141
142
143
144
145
146
147
148
149
150
151
152
153
154
155
156
157
158
159
160
161
162
163
164
165
166
167
168
169
170
171
172
173
174
175
176
177
178
179
180
181
182
183
184
185
186
187
188
189
190
191
192
193
194
195
196
197
198
199
200
201
202
203
204
205
206
207
208
209
210
211
212
213
214
215
216
217
218
219
220
221
222
223
224
225
226
227
228
229
230
231
232
233
234
235
236
237
238
239
240
241
242
243
244
245
246
247
248
249
250
251
252
253
254
255
256
257
258
259
260
261
262
263
264beautify()
headStyle(fontsize)
padding-left: unit(fontsize + 12, 'px')
&:before
margin-left: unit((-(fontsize + 6)), 'px')
font-size: unit(fontsize, 'px')
&:hover
padding-left: unit(fontsize + 18, 'px')
h1,
h2,
h3,
h4,
h5,
h6
transition: all .2s ease-out
&:before
position: absolute
top: calc(50% - 7px)
color: $title-prefix-icon-color
content: $title-prefix-icon
line-height: 1
transition: all .2s ease-out
@extend .fontawesomeIcon
&:hover
&:before
color: $light-blue
h1
headStyle(20)
h2
headStyle(18)
h3
headStyle(16)
h4
headStyle(14)
h5
headStyle(12)
h6
headStyle(12)
ol,
ul
p
margin: 0 0 8px
li
&::marker
color: $light-blue
font-weight: 600
font-size: 1.05em
&:hover
&::marker
color: var(--pseudo-hover)
ul > li
list-style-type: circle
#article-container
word-wrap: break-word
overflow-wrap: break-word
a
color: $theme-link-color
&:hover
text-decoration: underline
img
display: block
margin: 0 auto 20px
max-width: 100%
transition: filter 375ms ease-in .2s
p
margin: 0 0 16px
iframe
margin: 0 0 20px
if hexo-config('anchor')
a.headerlink
&:after
@extend .fontawesomeIcon
float: right
color: var(--headline-presudo)
content: '\f0c1'
font-size: .95em
opacity: 0
transition: all .3s
&:hover
&:after
color: var(--pseudo-hover)
h1,
h2,
h3,
h4,
h5,
h6
&:hover
a.headerlink
&:after
opacity: 1
ol,
ul
ol,
ul
padding-left: 20px
li
margin: 4px 0
p
margin: 0 0 8px
if hexo-config('beautify.enable')
if hexo-config('beautify.field') == 'site'
beautify()
else if hexo-config('beautify.field') == 'post'
&.post-content
beautify()
> :last-child
margin-bottom: 0
#post
.tag_share
.post-meta
&__tag-list
display: inline-block
&__tags
display: inline-block
margin: 8px 8px 8px 0
padding: 0 12px
width: fit-content
border: 1px solid $light-blue
border-radius: 12px
color: $light-blue
font-size: .85em
transition: all .2s ease-in-out
&:hover
background: $light-blue
color: var(--white)
.post_share
display: inline-block
float: right
margin: 8px 0
width: fit-content
.social-share
font-size: .85em
.social-share-icon
margin: 0 4px
width: w = 1.85em
height: w
font-size: 1.2em
line-height: w
.post-copyright
position: relative
margin: 40px 0 10px
padding: 10px 16px
border: 1px solid var(--light-grey)
transition: box-shadow .3s ease-in-out
overflow: hidden
border-radius: 12px
background: linear-gradient(45deg, #f6d8f5, #c2f1f0, #f0debf);
&:before
background var(--heo-post-blockquote-bg)
position absolute
right -26px
top -120px
content '\f25e'
font-size 200px
font-family 'Font Awesome 5 Brands'
opacity .2
&:hover
box-shadow: 0 0 8px 0 rgba(232, 237, 250, .6), 0 2px 4px 0 rgba(232, 237, 250, .5)
.post-copyright
&-meta
color: $light-blue
font-weight: bold
&-info
padding-left: 6px
a
text-decoration: none
word-break: break-word
&:hover
text-decoration: none
.post-copyright-cc-info
color: $theme-color;
.post-outdate-notice
position: relative
margin: 0 0 20px
padding: .5em 1.2em
border-radius: 3px
background-color: $noticeOutdate-bg
color: $noticeOutdate-color
if hexo-config('noticeOutdate.style') == 'flat'
padding: .5em 1em .5em 2.6em
border-left: 5px solid $noticeOutdate-border
&:before
@extend .fontawesomeIcon
position: absolute
top: 50%
left: .9em
color: $noticeOutdate-border
content: '\f071'
transform: translateY(-50%)
.ads-wrap
margin: 40px 0
.post-copyright-m-info
.post-copyright-a,
.post-copyright-c,
.post-copyright-u
display inline-block
width fit-content
padding 2px 5px
[data-theme="dark"]
#post
.post-copyright
background #07080a
text-shadow #bfbeb8 0 0 2px
border 1px solid rgb(19 18 18 / 35%)
box-shadow 0 0 5px var(--theme-color)
animation flashlight 1s linear infinite alternate
.post-copyright-info
color #e0e0e4
#post
.post-copyright__title
font-size 22px
.post-copyright__notice
font-size 15px
.post-copyright
box-shadow 2px 2px 5px默认项的配置
作者:
[BlogRoot]\_config.yml中的author配置项1
2
3
4
5
6
7
8# Site
title: Akilarの糖果屋
subtitle: Akilar.top
description:
keywords:
author: Akilar #默认作者
language: zh-CN
timezone: ''许可协议:
[BlogRoot]\_config.butterfly.yml中的license和license_url配置项1
2
3
4
5post_copyright:
enable: true
decode: true
license: CC BY-NC-SA 4.0
license_url: https://creativecommons.org/licenses/by-nc-sa/4.0/
页面覆写配置项,修改对应文章的
front-matter1
2
3
4
5
6
7
8
9---
title: Copyright-beautify # 文章名称
date: 2021-03-02 13:52:46 # 文章发布日期
updated: 2021-03-02 13:52:46 # 文章更新日期
copyright_author: Nesxc # 作者覆写
copyright_url: https://www.nesxc.com/post/hexocc.html # 原文链接覆写
license: # 许可协议名称覆写
license_url: # 许可协议链接覆写
---
文章H1~H6标题小风车转动效果
点击查看教程
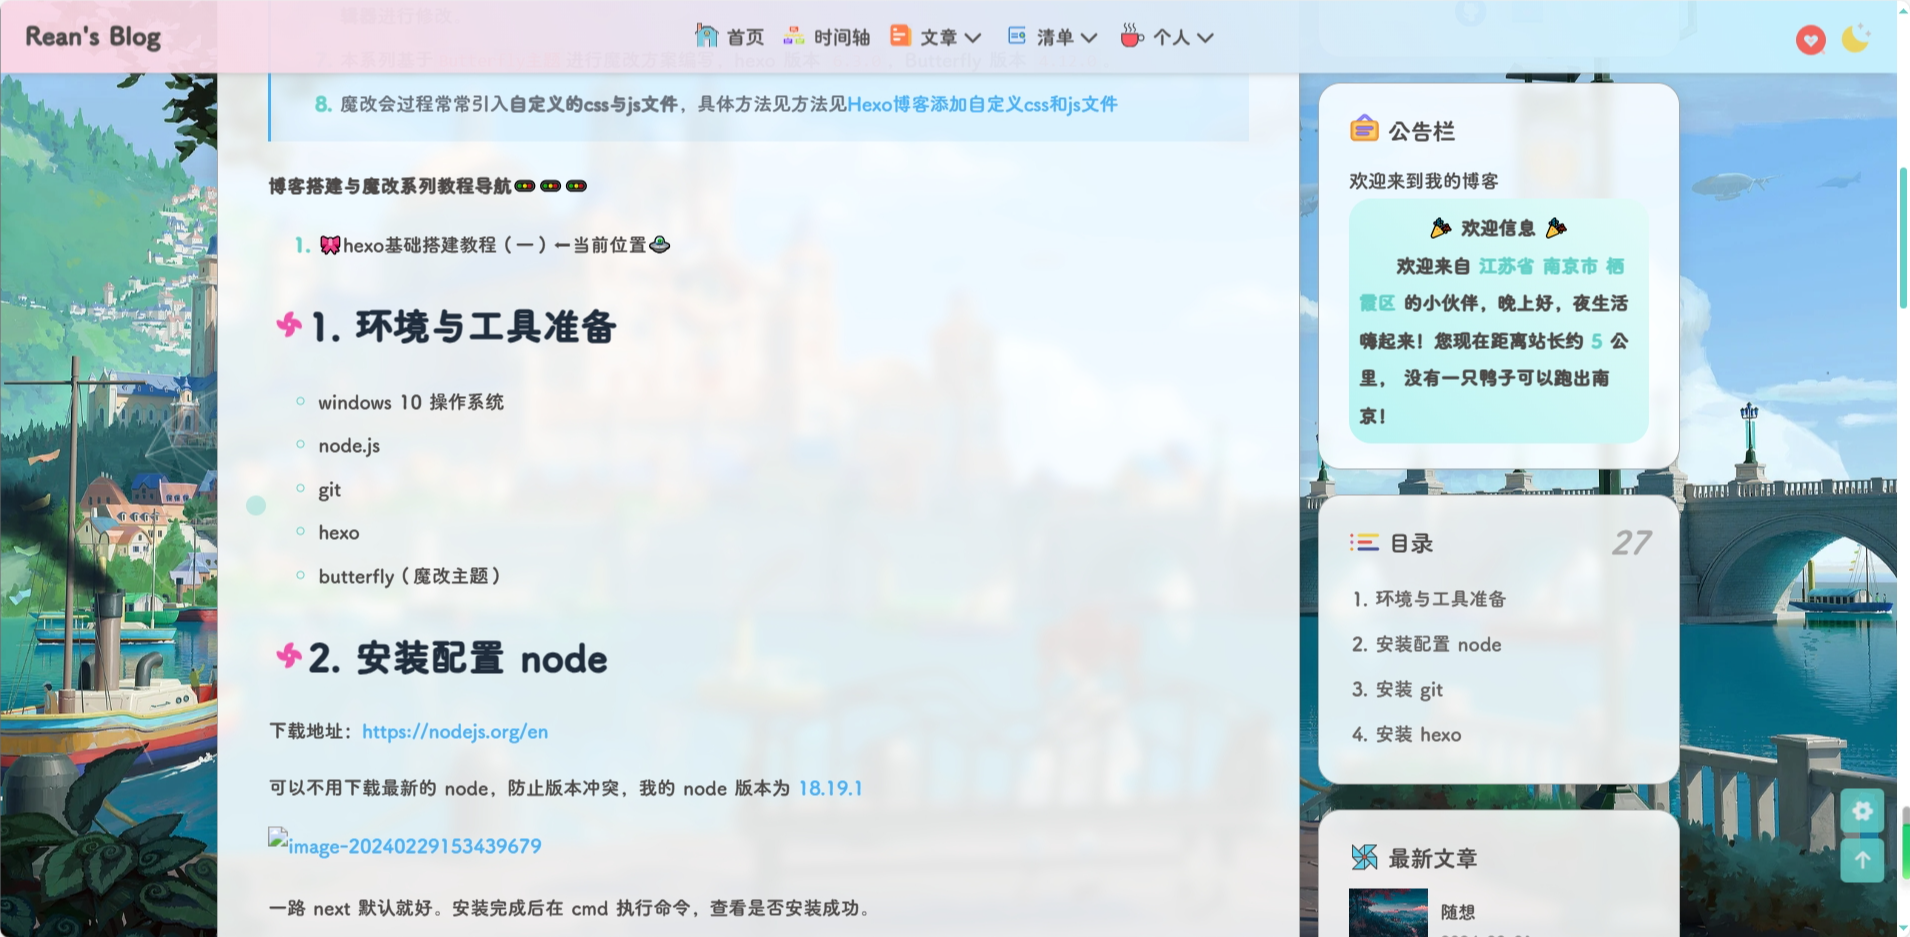
修改主题配置文件
_config.butterfly.yml文件的beautify配置项:1
2
3
4
5
6beautify:
enable: true
field: post # site/post
# title-prefix-icon: '\f0c1' 原内容
title-prefix-icon: '\f863'
title-prefix-icon-color: "#F47466"在
[BlogRoot]\source\css\custom.css中加入以下代码,可以自己调节一下转速:1
2
3
4
5
6
7
8
9
10
11
12
13
14
15
16
17
18
19
20
21
22
23
24
25
26
27
28
29
30
31
32
33
34
35
36
37
38
39
40
41
42
43
44
45
46
47
48
49
50
51
52
53
54
55
56
57
58
59
60
61
62
63
64
65
66
67
68
69
70
71
72
73
74
75
76
77
78
79
80
81
82
83
84
85
86
87
88
89
90
91
92
93
94
95
96
97
98
99/* 文章页H1-H6图标样式效果 */
/* 控制风车转动速度 4s那里可以自己调节快慢 */
h1::before,
h2::before,
h3::before,
h4::before,
h5::before,
h6::before {
-webkit-animation: ccc 4s linear infinite;
animation: ccc 4s linear infinite;
}
/* 控制风车转动方向 -1turn 为逆时针转动,1turn 为顺时针转动,相同数字部分记得统一修改 */
@-webkit-keyframes ccc {
0% {
-webkit-transform: rotate(0deg);
transform: rotate(0deg);
}
to {
-webkit-transform: rotate(-1turn);
transform: rotate(-1turn);
}
}
@keyframes ccc {
0% {
-webkit-transform: rotate(0deg);
transform: rotate(0deg);
}
to {
-webkit-transform: rotate(-1turn);
transform: rotate(-1turn);
}
}
/* 设置风车颜色 */
#content-inner.layout h1::before {
color: #ef50a8;
margin-left: -1.55rem;
font-size: 1.3rem;
margin-top: -0.23rem;
}
#content-inner.layout h2::before {
color: #fb7061;
margin-left: -1.35rem;
font-size: 1.1rem;
margin-top: -0.12rem;
}
#content-inner.layout h3::before {
color: #ffbf00;
margin-left: -1.22rem;
font-size: 0.95rem;
margin-top: -0.09rem;
}
#content-inner.layout h4::before {
color: #a9e000;
margin-left: -1.05rem;
font-size: 0.8rem;
margin-top: -0.09rem;
}
#content-inner.layout h5::before {
color: #57c850;
margin-left: -0.9rem;
font-size: 0.7rem;
margin-top: 0rem;
}
#content-inner.layout h6::before {
color: #5ec1e0;
margin-left: -0.9rem;
font-size: 0.66rem;
margin-top: 0rem;
}
/* s设置风车hover动效 6s那里可以自己调节快慢*/
#content-inner.layout h1:hover,
#content-inner.layout h2:hover,
#content-inner.layout h3:hover,
#content-inner.layout h4:hover,
#content-inner.layout h5:hover,
#content-inner.layout h6:hover {
color: var(--theme-color);
}
#content-inner.layout h1:hover::before,
#content-inner.layout h2:hover::before,
#content-inner.layout h3:hover::before,
#content-inner.layout h4:hover::before,
#content-inner.layout h5:hover::before,
#content-inner.layout h6:hover::before {
color: var(--theme-color);
-webkit-animation: ccc 6s linear infinite;
animation: ccc 6s linear infinite;
}
/*--- 图片圆角 -------*/
/* 下一篇文章的圆角 */
.relatedPosts > .relatedPosts-list > div,
#pagination.pagination-post,
.postImgHover img,
#pagination .prev-post img,
#pagination .next-post img,
.relatedPosts > .relatedPosts-list > div img {
border-radius: 12px;
}
/*--- 文章页H1-H6图标样式效果end ---*/在主题配置文件
_config.butterfly.yml的inject配置项进行引入(不再赘述)。
版权下面标签排列
点击查看教程
首先在
[BlogRoot]\themes\butterfly\layout\post.pug中修改如下,大约在 14 行左右1
2
3
4
5
6
7
8
9
10.tag_share
if (theme.post_meta.post.tags)
.post-meta__tag-list
each item, index in page.tags.data
+ a(href=url_for(item.path)).post-meta__tags
+ .tags-punctuation
+ svg.faa-tada.icon(style="height:1.1em;width:1.1em;fill:currentColor;position:relative;margin-right:3px" aria-hidden="true")
+ use(xlink:href='#icon-zhifeiji')
+ =item.name
include includes/third-party/share/index.pug在
custom.css中添加1
2
3
4
5
6
7
8
9
10
11
12
13
14
15
16
17
18/*-------------- 版权下面标签排列 ---------*/
#post .tag_share .post-meta__tag-list {
display: flex;
}
#post .tag_share .post-meta__tags {
border: 1px solid var(--theme-color) ;
color: var(--theme-color);
display: flex;
border-radius: 20px;
}
a:hover {
color: var(--theme-color);
}
#post .tag_share .post-meta__tags:hover {
background: var(--theme-color) ;
}
/*-------- 版权下面标签排列end ---------*/
cdn.jsdelivr.net 挂载错误
点击查看教程
目前jsdelivr被墙了,即被屏蔽,这导致国内大陆地区无法访问。很多插件、开源项目用到了jsdelivr,解决方法的核心思想就是换一个服务商,换一个cdn服务提供商。解决方法:①将所有 cdn.jsdelivr.net 更换为 fastly.jsdelivr.net实例:xxxx://cdn.jsdelivr.net/npm/xxxx/src/assets/images/logo.png改成xx
在
[BlogRoot]\themes\butterfly\layout\includes\head\preconnect.pug中修改1
2
3
4
5
6const providers = {
+ 'jsdelivr': '//fastly.jsdelivr.net',
'cdnjs': '//cdnjs.cloudflare.com',
'unpkg': '//unpkg.com',
'custom': custom_format && custom_format.match(/^((https?:)?(\/\/[^/]+)|([^/]+))(\/|$)/)[1]
}在
[BlogRoot]\themes\butterfly\scripts\events\cdn.js中修改1
2
3
4
5
6
7const cdnSource = {
local: cond === 'internal' ? `${cdnjs_file + verType}` : `/pluginsSrc/${name}/${file + verType}`,
+ jsdelivr: `https://fastly.jsdelivr.net/npm/${name}${verType}/${min_file}`,
unpkg: `https://unpkg.com/${name}${verType}/${file}`,
cdnjs: `https://cdnjs.cloudflare.com/ajax/libs/${cdnjs_name}/${version}/${min_cdnjs_file}`,
custom: (CDN.custom_format || '').replace(/\$\{(.+?)\}/g, (match, $1) => value[$1])
}
引入 csdn 图片错误
点击查看教程

由于图床安全问题,使用 csdn 的博客图床地址,但是由于 csdn 开启了防盗链,所以直接在自己的博客网站用引用地址会报错,所以需要设置一下
在
[BlogRoot]\themes\butterfly\layout\includes\head.pug中添加1
2
3
4
5
6
7meta(name ="format-detection" content="telephone=no")
meta(name="theme-color" content=themeColor)
+ //- 取消防盗链
+ <meta name="referrer" content="never" />
//- Open_Graph
include ./head/Open_Graph.pug
个人信息卡片背景图
点击查看教程
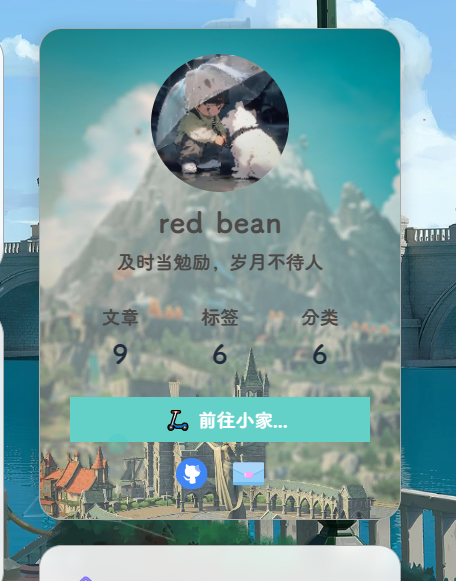
在
custom.css中加入以下样式:1
2
3
4
5
6
7
8
9
10
11
12
13/* 个人信息卡片背景图 */
[data-theme="light"] #aside-content > .card-widget.card-info {
background-image: url(https://sourcebucket.s3.ladydaily.com/img/snowflower.webp);
background-repeat: no-repeat;
background-attachment: inherit;
background-size: 100%;
}
[data-theme="dark"] #aside-content > .card-widget.card-info {
background-image: url(https://sourcebucket.s3.ladydaily.com/img/aurora.webp);
background-repeat: no-repeat;
background-attachment: inherit;
background-size: 100%;
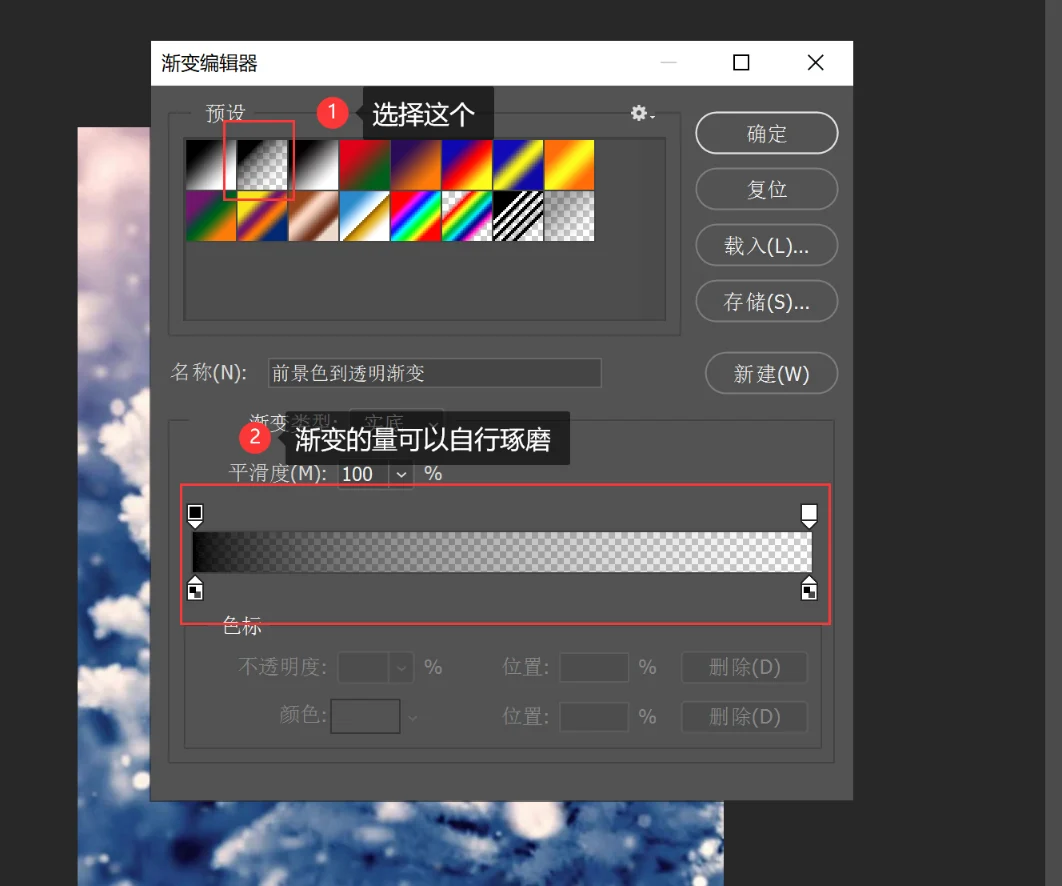
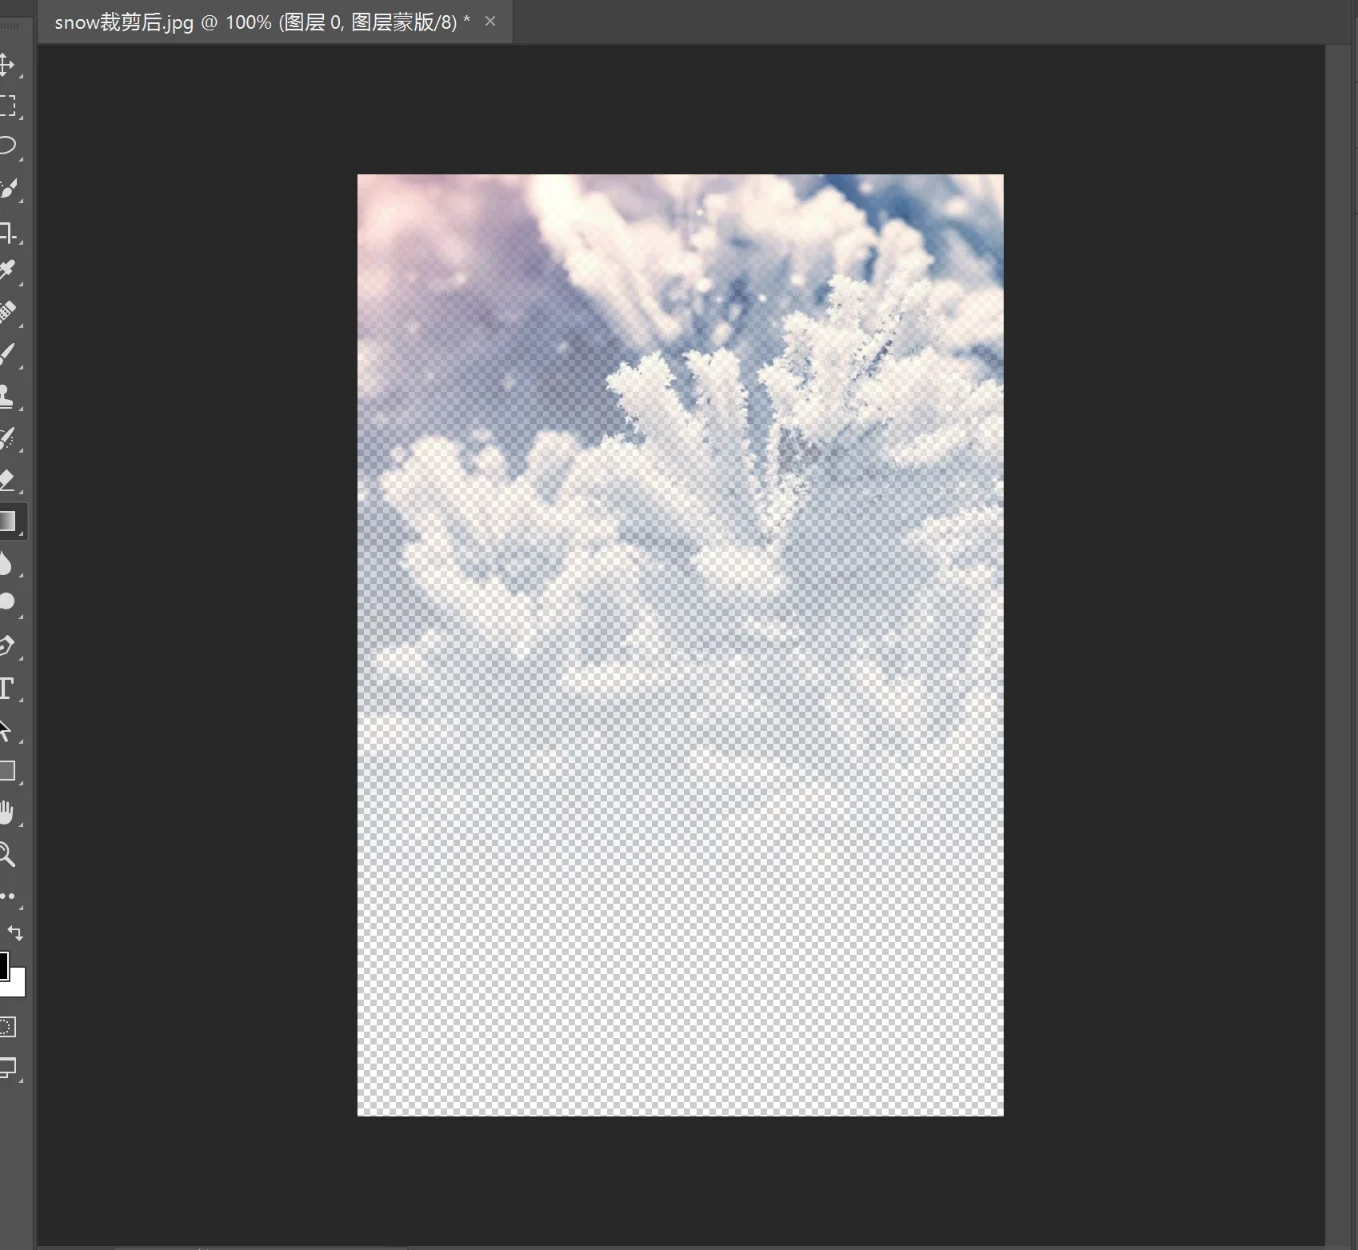
}这里一个是白天模式,一个是夜间模式,可以根据自己的喜好选择图片,我的图片你可以下载下来,但是不能直接引用,因为开了防盗链。图片最好是下边透明,上边不透明的透明度连续渐变的形式,可以用PS制作。
制作这样的图片也不难,首先下载
PS,以及准备好一张尺寸大概在700*1000的图片,用PS打开图片,按照以下步骤给图片添加一个渐变遮罩就可以,然后将图片另存为PNG格式的,然后将图片用软件压缩一下,压缩图片具体方法见[网站性能优化的一些小技巧,最后只要不是太大就可以!

控制台样式自定义(安知鱼)
点击查看教程
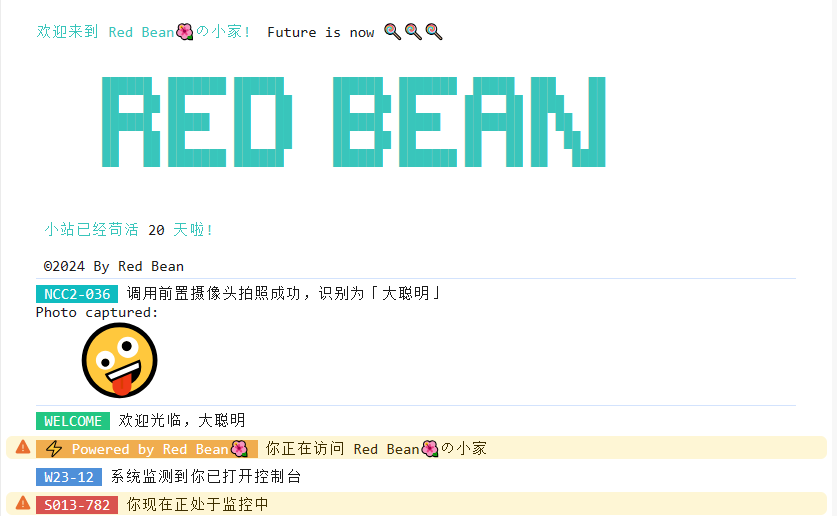
详见:console的高级用法
ASCII字符画生成器:https://tools.miku.ac/taag/,选择 ANSI Regular
新建js文件
[BlogRoot]\source\js\console.js,并写入如下代码:1
2
3
4
5
6
7
8
9
10
11
12
13
14
15
16
17
18
19
20
21
22
23
24
25
26
27
28
29
30
31
32
33
34
35
36
37
38
39
40
41
42
43
44
45
46
47
48
49
50
51
52
53
54
55
56
57
58
59
60
61
62
63
64
65
66
67
68
69
70
71
72
73
74
75
76
77
78
79
80
81
82var now1 = new Date();
function createtime1() {
var grt = new Date("02/21/2024 00:00:00"); //此处修改你的建站时间或者网站上线时间
now1.setTime(now1.getTime() + 250);
var days = (now1 - grt) / 1000 / 60 / 60 / 24;
var dnum = Math.floor(days);
var ascll = [
`欢迎来到 Red Bean🌺の小家!`,
`Future is now 🍭🍭🍭`,
`
██████ ███████ ██████ ██████ ███████ █████ ███ ██
██ ██ ██ ██ ██ ██ ██ ██ ██ ██ ████ ██
██████ █████ ██ ██ ██████ █████ ███████ ██ ██ ██
██ ██ ██ ██ ██ ██ ██ ██ ██ ██ ██ ██ ██
██ ██ ███████ ██████ ██████ ███████ ██ ██ ██ ████
`,
"小站已经苟活",
dnum,
"天啦!",
"©2024 By Red Bean",
];
setTimeout(
console.log.bind(
console,
`\n%c${ascll[0]} %c ${ascll[1]} %c ${ascll[2]} %c${ascll[3]}%c ${ascll[4]}%c ${ascll[5]}\n\n%c ${ascll[6]}\n`,
"color:#39c5bb",
"",
"color:#39c5bb",
"color:#39c5bb",
"",
"color:#39c5bb",
""
)
);
}
createtime1();
function createtime2() {
var ascll2 = [`NCC2-036`, `调用前置摄像头拍照成功,识别为「大聪明」`, `Photo captured: `, ` 🤪 `];
setTimeout(
console.log.bind(
console,
`%c ${ascll2[0]} %c ${ascll2[1]} %c \n${ascll2[2]} %c\n${ascll2[3]}`,
"color:white; background-color:#10bcc0",
"",
"",
'background:url("https://unpkg.zhimg.com/anzhiyu-assets@latest/image/common/tinggge.gif") no-repeat;font-size:450%'
)
);
setTimeout(console.log.bind(console, "%c WELCOME %c 欢迎光临,大聪明", "color:white; background-color:#23c682", ""));
setTimeout(
console.warn.bind(
console,
"%c ⚡ Powered by Red Bean🌺 %c 你正在访问 Red Bean🌺の小家",
"color:white; background-color:#f0ad4e",
""
)
);
setTimeout(console.log.bind(console, "%c W23-12 %c 系统监测到你已打开控制台", "color:white; background-color:#4f90d9", ""));
setTimeout(
console.warn.bind(console, "%c S013-782 %c 你现在正处于监控中", "color:white; background-color:#d9534f", "")
);
}
createtime2();
// 重写console方法
console.log = function () { };
console.error = function () { };
console.warn = function () { };在主题配置文件
[BlogRoot]\_config.butterfly.yml中引入该js文件1
2
3inject:
bottom:
+ - <script async src="/js/console.js"></script> # 控制台打印重启项目并按f12,看看控制台那一栏就可以看见效果
1
2
3
4
# git bash
hexo cl && hexo g && hexo s
# vscode
hexo cl; hexo g; hexo s
网站恶搞标题
点击查看教程
新建文件
[BlogRoot]\source\js\title.js,写入以下内容:1
2
3
4
5
6
7
8
9
10
11
12
13
14
15
16
17//动态标题
var OriginTitile = document.title;
var titleTime;
document.addEventListener('visibilitychange', function () {
if (document.hidden) {
//离开当前页面时标签显示内容
document.title = '😲(#°Д°)网页突然崩溃了!!!';
clearTimeout(titleTime);
} else {
//返回当前页面时标签显示内容
document.title = '😝ヾ(≧▽≦*)o又好了';
//两秒后变回正常标题
titleTime = setTimeout(function () {
document.title = OriginTitile;
}, 2000);
}
});在主题配置文件
_config.butterfly.yml引入该文件:1
2
3inject:
bottom:
+ - <script async src="/js/title.js"></script> # 网站恶搞标题重启项目:
1
2
3
4# git bash
hexo cl && hexo g && hexo s
# vscode
hexo cl; hexo g; hexo s
Hexo 迁移到新电脑
点击查看教程
参考教程:CSDN:Hexo博客迁移到新电脑
在新电脑行进行环境准备工作,具体的步骤和Hexo博客搭建基础教程(一)的第1-7步一模一样,大家在新电脑上跟着做即可(注意千万不要做第8步,
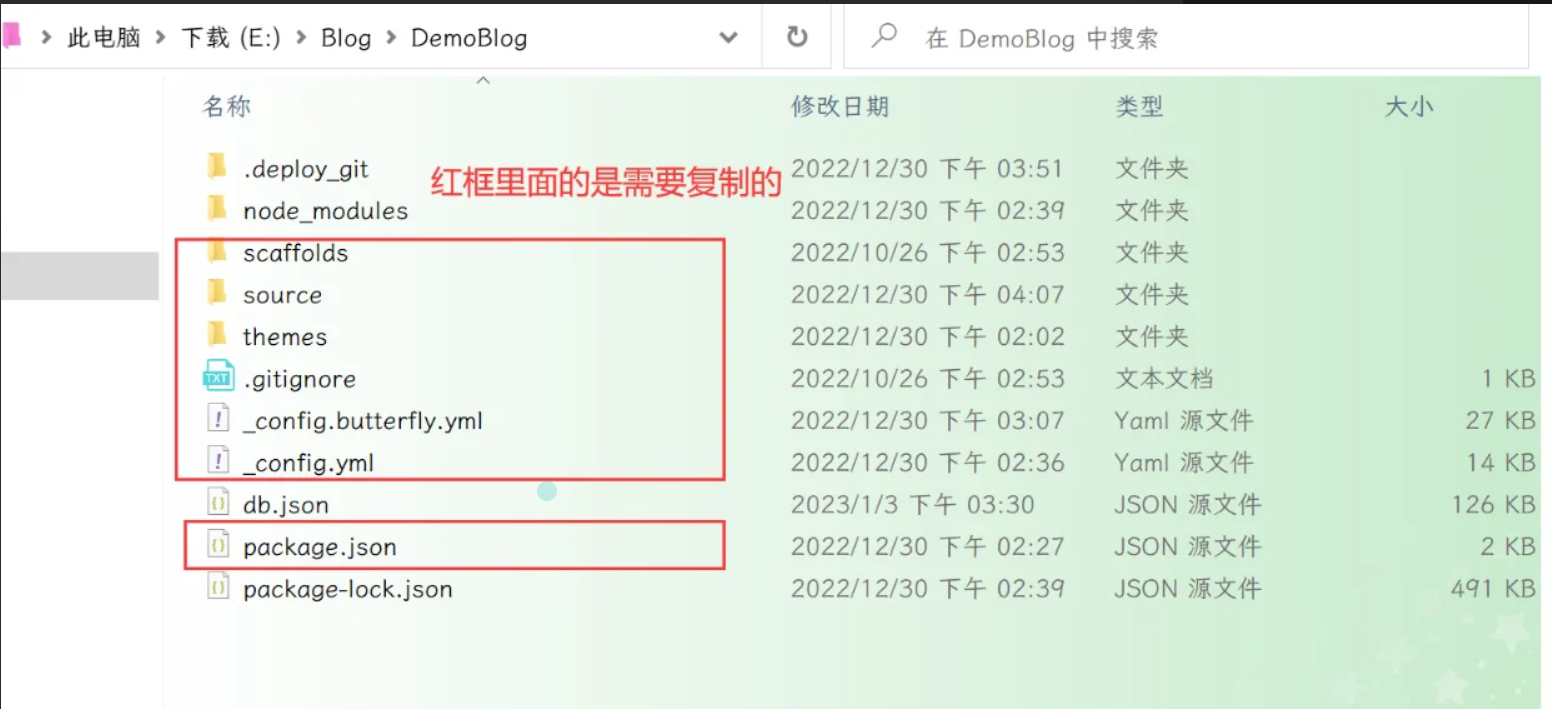
hexo init blog-demo这一步会覆盖并还原你原本的的源码文件)这时候新建一个文件夹
new-blog,用来装你的新博客源码的,进入这个文件夹,准备复制我们旧的博客源码进来,我们可以看到旧的博客项目结构是如下样子的:这里红框内的都是需要复制迁移到新的博客的,具体的要不要保留见下表:
| 需要复制的 | 需要删除的 |
| :—————————————————————————————: | :—————————————————————————————: |
| _config.yml:站点配置文件 | .git:无论是在站点根目录下,还是主题目录下的.git文件,都可以删掉 |
| _config.butterfly.yml:主题配置文件,为了方便主题升级剥离出来的配置文件 | node_modules:npm install会根据package.json生成 |
| package.json:说明使用哪些依赖包 | public:hexo g会重新编译生成 |
| scaffolds:文章的模板 | .deploy_git:在使用hexo d时也会重新生成 |
| source:自己写的博客源码 | db.json文件:hexo s快速启动所需的数据库 |
| themes:主题文件夹(魔改都在里面啦) | package-lock.json:记录依赖之间的内部依赖关系,可以根据package.json重新生成 |
| .gitignore:说明在提交时哪些文件可以忽略 | |复制所需的文件到新电脑的文件夹之后,在
git bash中切换目录到新拷贝的文件夹里,使用npm install命令,进行模块安装。这里绝对不能使用hexo init初始化,因为有的文件我们已经拷贝生成过来了,所以不必用hexo init去整体初始化,如果不慎用了,则站点的配置文件_config.yml里面内容会被重置,所以这一步一定要慎重:1
npm i
执行以下命令情况并启动项目,进入
localhost:4000进行验证:1
2
3
4# git bash
hexo cl && hexo g && hexo s
# vscode
hexo cl; hexo g; hexo s当本地能成功启动,之后就可以部署到Github,执行以下代码:
1
hexo d
如果出现
Deploy done,则说明部署成功,稍等两分钟,打开浏览器访问之前的域名就可以看到之前的博客,以后你可以在这台新电脑上魔改和写文章了~
文章加密插件
点击查看教程

在根目录执行以下命令
1
npm install --save hexo-blog-encrypt
Front matter配置方法
1
2
3
4
5
6
7
8
9
10
11
12---
title: Hello World
tags:
- 作为日记加密
date: 2016-03-30 21:12:21
password: mikemessi
abstract: 有东西被加密了, 请输入密码查看.
message: 您好, 这里需要密码.
theme: xray
wrong_pass_message: 抱歉, 这个密码看着不太对, 请再试试.
wrong_hash_message: 抱歉, 这个文章不能被校验, 不过您还是能看看解密后的内容.
---配置文件
[BlogRoot]\_config.yml中针对tags的加密1
2
3
4
5
6
7
8
9
10# Security
encrypt: # hexo-blog-encrypt
abstract: 有东西被加密了, 请输入密码查看.
message: 您好, 这里需要密码.
tags:
- {name: tagName, password: 密码A}
- {name: tagName, password: 密码B}
theme: xray
wrong_pass_message: 抱歉, 这个密码看着不太对, 请再试试.
wrong_hash_message: 抱歉, 这个文章不能被校验, 不过您还是能看看解密后的内容.你可以在线挑选你喜欢的主题,并应用到你的博客中:
重启项目进入对应的文章页面即可看到加密效果
1
2
3
4# git bash
hexo cl && hexo g && hexo s
# vscode
hexo cl; hexo g; hexo s
- 采用 https 协议
- 本地部署可以看到效果,如果部署到云服务器需要购买 ssl 证书